

The Shopify SEO Handbook
Part 1: Understanding SEO
A comprehensive guide to Shopify SEO, with easy to follow instructions written by experienced industry professionals
The Shopify SEO Handbook
The Basics - What is SEO?
SEO stands for Search Engine Optimization—the process of optimizing websites to improve visibility in search engines. There are 3 primary components of an SEO campaign: On-Page SEO, Technical SEO, and Off-Page SEO.

On-Page SEO deals with the front-end of your website
On-page SEO covers anything you can do on the front-end of a webpage to improve search engine rankings, like editing product descriptions, titles and written content, headers, footers, blog posts, navigation menu labels, and menu structure.
Technical SEO deals with the backend of your website
Technical SEO is the process of optimizing the technical settings of a website for search engines, but it can also include improvements for accessibility, localization, and languages. Examples of technical SEO include theme and platform settings, JSON schema markup, hreflang settings for international websites, page speed insights and core web vitals, image resizing, image alts, and any other technical setting.
Off-Page SEO deals with external websites
Off-page SEO covers anything you can optimize outside of your main website (or externally). Backlinks are an example of an off-page SEO factor. Other examples include social media and PR, guest posts, referral sites like Yelp and Clutch.co, directory listings, Google Business Profiles, reviews on 3rd party platforms, podcasts, and video sites like YouTube and Vimeo.
Search engines help users discover new websites, new brands, new ideas, and new ways to spend their hard-earned money. The primary objective of most SEO campaigns is to improve keyword rankings in search engines. But why are rankings so important? The answer is visibility.
The higher your pages rank in search engines, the more visible your business is, and higher visibility means more clicks, while low-ranking websites suffer the opposite effect. According to a recent study:
Sites in the #1 position receive 28% of all clicks
Sites in the top 3 positions receive over 70% of all clicks
Sites in positions 4-10 receive only about 1% of all clicks
Sites below position 10 receive less than 1% of all clicks
You read that right. Pages ranked below position #3 only reach 1% of their organic audience. But outranking the competition isn't easy. It takes a lot of time and effort to manage a successful SEO campaign, but the payoff is HUGE.
Why is SEO important?
Helpful Facts About SEO
SEO is long-term commitment. It can take months or even years to achieve #1 rankings for high volume, high competition keywords
SEO works best when combined with other marketing strategies like email campaigns, SMS campaigns & pay-per-click advertising.
SEO is a competition. The team that delivers the best overall user experience, wins.
Rankings are relative, not absolute. You don’t need a perfect website to top search results, you just need a better website than your competitors.
Helpful content is king. Google's search algorithm is trained to favor sites that deliver the best possible user experience in the form of well-organized, useful, helpful content.

What can SEO do for your brand?
There are a lot of reasons to invest in SEO for your brand. An SEO campaign can achieve a variety of business-minded goals:
Build your brand's presence on new platforms, social networks, and even new mediums like the Metaverse
Appear in AI-summary searches on ChatGPT, Google Gemini, and about a zillion other platforms
Maintain a consistent message and control the conversation about your brand across all marketing channels
Keep your customers updated with important news and announcements
Break into new markets, locations, and demographics
Gain better exposure, increase brand awareness and improve brand recognition
Become a thought-leader that educates and informs consumers
Become the go-to authority in your vertical and be a hub for industry news and information
Develop new brand partnerships and B2B relationships that can help your business grow
Provide training, learning materials, manuals, and documentation for your customers and staff
Manage your reputation, get more positive reviews, control the conversation around your brand
Increase every KPI that matters: traffic, discovery, pageviews, session duration, CTR, revenue, and repeat business
Understanding Google's Search Algorithm
The key to understanding SEO is to first understand Google's search engine algorithm, and the best way to understand the algorithm is to read the instruction manual.
That's right, Google has an instruction manual called Google Search Central that contains mountains of resources, lessons, FAQs, and even a full beginner's course called the SEO Starter Guide.
Google's documentation gives us insights into how Search Engines work, and what site owners and SEOs should (and shouldn't) do to improve our search presence.

How does Google Search work?
Google Search is, at its heart, a referral website. Google's customers (aka people who Google stuff) expect high-quality, relevant results for every query. Google's reputation is directly tied to delivering the best possible search results for over a trillion search queries and counting. If you want Google to recommend your site to its users, then your site must adhere to the quality guidelines that Google recommends.
To put Google Search into perspective, think of it this way: On one side of the Search equation, there are billions of people asking trillions of questions, all of them expecting a quick and easy answer from their search engine. On the other side of the equation are trillions of webpages stored on servers all around the world. Google’s job is to take those trillions of questions, and match them up with a list of webpages that are most likely to answer each question, with each page ranked in order of relevance to each query.
Sounds simple, right? But how does a computer program judge the quality of a website?
Imagine you’re a computer program whose job is to scour the whole internet to locate and rank the highest quality websites. What criteria would you use to judge a website’s quality? Well for starters…
Product data should be clean and well-organized, with an intuitive menu system that helps users navigate the site.
Page titles and URLs should be relevant and specific, so that users can gauge what the page is about before they click on it. No one wants to click on “New Landing Page 1”
Clickable elements should be labeled clearly, accurately, and adhere to ADA guidelines. No user should ever be tricked into visiting unwanted pages.
Content should be skimmable, browsable, and clearly labeled with section headings.
Content should load quickly and efficiently, with a CDN to serve large files.
The publisher of the website should be reputable and trustworthy, with readily accessible contact info, social media links, and consistent messaging.
Sites should host useful, reliable, trustworthy, people-first content.
Read up on how How Search Works, where Google explains to us exactly how they rank websites for quality:
To give you the most useful information, Search algorithms look at many factors and signals, including the words of your query, relevance and usability of pages, expertise of sources, and your location and settings. The weight applied to each factor varies depending on the nature of your query. For example, the freshness of the content plays a bigger role in answering queries about current news topics than it does about dictionary definitions.
Read the whole page here

The Shopify SEO Handbook
Part 2: On-Page Optimizations
Learn how to create perfectly optimized products and collections in your Shopify Plus storefront.
What the heck is an "Optimization" anyway?
One of the most confusing things about doing SEO on your own website is learning all the terminology and jargon. But while there are many confusing terms to learn (don't even get me started on canonicalization), On-Page Optimization is pretty much exactly what it sounds like.
Optimizing is the process of editing a webpage in order to increase that page's rankings in search engine results. Edits to page content are known as On-Page Optimizations (as opposed to Technical Optimizations, which are done in the backend settings).
How to Do On-Page Optimizations
On-Page Optimizations can encompass many different tasks and strategies, but generally speaking, "Optimizing" a webpage means adding or removing content elements in order to make the page more appealing to users and search engine algorithms.
Common examples of On-Page Optimizations
Adding relevant keywords to the page title
Adding relevant keywords to the SEO title (aka meta title)
Adding relevant keywords to the SEO description (aka meta description)
Adding relevant keywords to the body copy
Making sure the page URL conveys the subject/purpose of the page
Making sure the page URL contains relevant keywords
Removing confusing or irrelevant content from the page
Adding H1 and H2 headings
Adding hyperlinks to other pages of your website
Adding outbound links to other websites
Adding images
Adding image alt text

How to optimize a Shopify product or collection page
The first step in optimizing any page of your website is to open three browser tabs.
In one browser tab, open the edit screen of the product, collection, or page you want to optimize.
In the second tab, navigate to the ‘front end’ of the page you’re optimizing, so you can see how the page appears to users who visit your site.
In the third tab, Google your target keyword and look at the highest ranking results. Take note of the Titles and Meta Descriptions that are being displayed. Look for commonalities and take note of the keywords that are being used by the top results.
Click on the highest ranking organic result (don’t click on the ‘sponsored’ results, those are Google Ads, which aren’t subject to organic ranking factors). Read your competitor’s content and compare it to your own content. Take note of the keywords that your competitor is using in the URL, title, and description of their product. Now go back to Google and do the same thing with the other high ranking results. Look for commonalities that you can emulate in your own content.
Go back to the Shopify admin tab and locate the title at the top of the page. Does your title contain any of those popular keywords? Is your target keyword buried all the way at the end of your product title? If possible, shift the most important keywords towards the beginning of your title.
Now look at the body content or description. Does your product description accurately and specifically describe your product? Make sure to mention the materials that your product is made of. Describe the fit and style of your product. Discuss how the product is used and who it’s for. Make sure to use keywords in your description. Make sure your description contains bullet points that summarize or reiterate the key product features described in the paragraph section of the description.
Now scroll to the bottom of the edit screen, and click on the “Search Engine Listing” area. Make sure your SEO title has the most important keywords towards the beginning. You can also add additional contextual information here, like the size, color, or material of the product. Follow this same process for the SEO description, remembering what your competitors’ meta descriptions looked like in Google Search results.
You can follow similar steps to optimize your product URL, but if you change the product URL, make sure to tick the box that says “Create a Redirect” — this is VERY IMPORTANT! Never change a URL without creating a redirect. There are more details about URL best practices below.
Now click save, then go to the ‘front end’ tab, refresh the page, and view the results of your optimizations. Repeat as necessary. (ed. note: it takes Google a few days to re-index your page after you make edits, so be patient! Your rankings won’t go up right away, so you may want to wait a week or so between optimizations.)
Remember, user experience is everything
The most important factor to Optimize for is USER EXPERIENCE. Google ranks webpages that provide a superior User Experience by providing useful, helpful, accurate information that's easy to use, easy to browse, and easy to understand. As you're optimizing your pages, continually ask yourself:
"What information is the user looking for when they search my target keyword? Am I providing that information in my content?”
Optimize for people, not search engines
We don't optimize webpages so that they’ll appeal to search engines, we optimize webpages so that search engines will suggest the page to more people. All of your optimizations should work towards the goal of making your webpage more useful to the PEOPLE who view it.
If you're not sure what your audience is looking for, head over to Google and search your target keyword yourself, and spend some time browsing the highest ranking results. Checking out the competition is the perfect way to start an optimization campaign.

On-Page Optimization Checklist
When optimizing or creating new pages for your website, there are a few universal guidelines that will help you get high-quality results:
✅ Put it in writing. Search engine algorithms are very sophisticated, but they’re not great at picking up context clues or reading between the lines. If you want Google to know that you’re an expert in something, you have to TELL Google that you’re an expert by putting it in writing on your website.
✅ Optimize one page at a time, one element at a time; When optimizing web pages, it's easy to get overwhelmed with all the options. To keep your optimizations on track, use a systematic approach and focus on optimizing one page at a time, one element at a time. Start with the page title and work your way down the page, making small, incremental improvements as you go.
✅ Before you start optimizing, choose a focus keyword. The focus keyword or keyphrase is the search term you want a page or post to rank for most. Your focus keyword will serve as the central theme around which all the content on that page revolves. Focus keywords help ensure that the information presented aligns with the user's search intent.
✅ Don't keyword stuff. Keyword stuffing is the practice of inserting a large number of keywords into Web content and meta tags in the attempt to artificially increase a page's ranking in search results and drive more traffic to the site. In other words, don't try to cram a bunch of extra keywords into your pages.
✅ Be as descriptive as possible. To maintain a clear and concise message, it is crucial to steer clear of using broad, nonspecific language. Vague descriptors cause confusion and hinder the effectiveness of your content.
✅ Write content for people, not search engines. Google's algorithm prefers webpages that deliver the best user experience. In most cases, the best user experience means presenting useful information that's well-organized and easy to understand.
✅ There’s no such thing as perfect. Your page doesn't have to be "perfect," it just has to be better than the top ranking result.
How to Write Perfect Page Titles
In the world of SEO, the page title reigns supreme as the most powerful and crucial page element. When search engine crawlers analyze a webpage, they turn to the page title to determine its subject or purpose. The relevance of other page features is judged by their correlation to the page title.
It is therefore imperative to give careful thought to crafting page titles that are not only easy to read and comprehend but also concise and authoritative in nature. The goal is to create titles that effortlessly convey the essence of the page to both users and search engine crawlers, leaving no room for ambiguity or confusion.
✅ Products, collections, and blog posts are pages too. Any website element with a distinct URL is considered a "page". Product titles, collection titles, and blog post titles are all examples of page titles.
✅ Titles should be easy to read and understand. When crafting your page titles, use concise and authoritative language. The aim is for both users and search engine crawlers to grasp the subject or purpose of the page simply by reading its title.
✅ Be consistent with page title structure. This is especially important if your site has a high number of pages, such as an eCommerce site with hundreds of products, collections, and supporting content. Maintaining consistency in your page titles enhances the overall user experience, streamlining the process of browsing through your products.
✅ Put the most important information in the first 60 characters of your title. Google only displays the first 60 characters of page titles; In order for search engines (and users) to understand the purpose of your page, the most important information must be within those first 60 characters.
✅ Use your focus keyword in the title of your page. Focus keywords keep SEO optimizations on track by creating a reference point for all the optimizations performed on a page. When possible, place your focus keyword towards the beginning of the title. This can be accomplished through the use of a colon, or separator such as a hyphen or pipe (see example).
In the example below, notice how we use the focus keyword to change the phrasing of the page title. Putting the most important keywords at the beginning of the title helps Google's crawlers (and users) understand the purpose of the page.
Focus keyword: eCommerce SEO
Original page title: Everything you need to know about eCommerce SEO
Optimized page title: eCommerce SEO: Everything You Need to Know
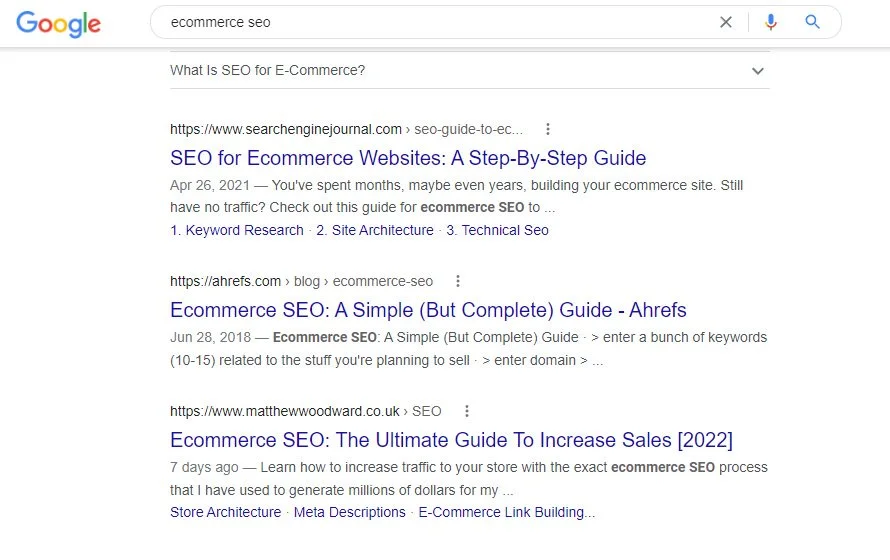
In the image above, note how the highest ranking results for the query "ecommerce seo" have placed the focus keyword at the beginning of the title.
URLs and Slugs
✅ ALWAYS use best practices for URLs; The internet runs on URLs. Crawlers use URLs to identify and catalog web pages, which makes URLs a critical component of any SEO campaign.
Best practices for URLs and Slugs
Use the focus keyword at or near the beginning of the URL slug
Always use hyphens between words
Avoid generic, nondescriptive URLs like "new-product-1" or "copy-of-product-1" because they can confuse crawlers and deliver a poor experience
Avoid special characters like underscores and punctuation (hyphens are ok).
Make them easy to understand - A user should be able to understand the purpose of your page just by looking at the URL
Remove unnecessary articles like the, and, but, is, etc.
The URL should closely resemble the page title; don't sneak in extra keywords (keyword stuffing) or exclude critical unique identifiers like color or size
The URL should contain the page's focus keyword
Avoid long, confusing URLs; try to keep your URLs around 60-70 characters
How long should URLs be?
There is no specific guideline for the number of characters in an “optimized” URL. Google’s suggestion is that a page URL should help users understand the subject or purpose of the page before they click on it. But that doesn’t mean that your URLs should be 300-characters long.
Generally speaking, your URL slug should contain 2-10 words that succinctly describe the content that’s contained within the page, and that closely resemble the page title.
URL Redirects
✅ Always use URL redirects (301 redirects). Changing the location of a page by changing the URL can confuse search engines and deliver a poor user experience—and resulting in a 404 (not found) error.
Sites with multiple 404 errors are often penalized by search engines and appear lower in search results.
If you're optimizing an existing page of a website, NEVER change the URL unless you also setup a URL redirect (aka 301 redirect) from the old URL to the new one.
Exceptions: If a page is brand new (less than 24 hours since being published) it's ok to change the URL without setting up a redirect. In Shopify, if you change the URL of a page, Shopify will automatically create a URL redirect for you, but you must make sure to tick the box before saving your changes (see below).

How to create & edit multiple URL redirects in Shopify
To add or edit multiple redirects in Shopify navigate to the admin window, then go to Online Store > Navigation > View URL Redirects. You'll see all the active redirects on your domain, and you'll be able to edit existing redirects, or add new redirects from there.

SEO Titles and Meta Descriptions
Q: What’s the difference between Page Titles and SEO Titles?
A: Page titles are displayed to users on your website, and SEO titles are displayed in search engine results. Therefore, SEO titles often contain additional information like the title or domain of your site.
✅ Create a compelling SEO title. The Meta Title, also called the Title Tag, refers to the text that is displayed on search engine result pages and browser tabs to indicate the topic of a webpage. On Shopify, the Meta Title is referred to as the SEO Title.
✅ SEO titles are found near the BOTTOM of the Shopify edit screen, in the Search Engine Listing area.
✅ Remember, Page Titles reside at the TOP of the Shopify edit screen. SEO Titles are not the same as Page Titles.
✅ SEO titles and Page Titles should be similar, but the SEO title may include additional contextual information about the page, such as the site title, product category, or any number of other variables.
In the example below, note how we've inserted the site title at the end of the SEO title.
PAGE TITLE: The Shopify SEO Handbook
SEO TITLE: The Shopify SEO Handbook | BlueSwitch
✅ SEO Titles should be less than 60 characters. Google only displays the first 60 characters of a meta title. Anything beyond 60 characters will be truncated and won't appear in search results. Putting the most important information towards the beginning of the title ensures that crucial information about the page will not be excluded from search results.
✅ Use a separator in your SEO title to add additional context to the end of your page title. This is most commonly accomplished with the use of a separator like a pipe | bullet point • or em dash —
Page Title: eCommerce SEO: Everything You Need to Know
SEO Title: eCommerce SEO: Everything You Need to Know | BlueSwitch SEO Handbook
In the example above, notice how we've added additional context to the meta title by adding a pipe | and additional language that will help search engine users understand the context of the page they're about to click on
✅ Write a compelling meta description. A meta description generally informs and interests search engine users with a short, relevant summary of what a particular page is about. Meta descriptions are like a pitch that convince the user that the page is exactly what they're looking for. The content in meta descriptions do not influence search rankings, so write meta descriptions that will appeal to users, not search engines.
✅ Limit meta descriptions to 150 characters or less. Meta descriptions over 150 characters will be cutoff by Google; to ensure your audience gets the right message, keep meta descriptions under 150 characters, and put the most important information (and keywords) up front.
✅ Meta descriptions must be unique; pages with duplicate meta descriptions will not appear in search results. It's better to have no meta description at all than to have a duplicate meta description.
Editing meta titles and meta descriptions in Shopify
If you want to edit the meta title, meta description, or slug on a Shopify product, follow these simple instructions.
Step 1: From the inventory menu, locate the Shopify product you want to edit and click into the edit screen
Step 2: Scroll all the way to the bottom of the edit screen and locate the section labeled Search Engine Listing and click EDIT
Step 3: Now edit the fields marked Page Title (meta title), Meta Description, and URL handle (slug) and click SAVE
How long should meta descriptions be?
Shopify meta descriptions can be as long as 320 characters, however Google only displays the first 150 characters. To encourage Google to use your meta descriptions, keep your meta descriptions under 150 characters.

How to Write Perfect Product Descriptions
Crafting the perfect product description isn't easy, but with a little practice and our product descriptions cheat sheet, you'll be publishing high-ranking product pages in no time.
To optimize a product description, locate the product you want to edit, then click into the edit screen and look for the section labeled Description.
✅ Use an intro section (1-2 paragraphs) that describes key facts about the product. Think of the intro paragraph as the "elevator pitch" for your product, and include the most important points of difference that make your product desirable.
✅ Use bullet points that list out the key features and benefits of a product. If you use more than one set of bullet points, make sure to label the different lists so that users and search engines can tell about the purpose of each list.
✅ Avoid long blocks of uninterrupted text. Most users do not visit a webpage with the purpose of reading the entire thing from top to bottom. Most often, users are skimming a page to look for a specific bit of information, or for the portion of the page that's relevant to their search query.
Large blocks of text are intimidating and difficult to parse out into smaller "bite size" ideas. Break up your content into paragraphs of 2-5 sentences, with H2 headings placed every 2 or 3 paragraphs.
✅ Use H2 headings to label different sections. Search engine crawlers use H2 tags the same way we use chapters in a book. Labeling the different sections of your content with H2 headings helps search engines understand the different sections of content, and H2 tags help users skim and read the content faster and more efficiently.
✅ DON'T add unnecessary H1 tags. The H1 tag is a "top level" tag that should only appear once per page. Most Shopify themes are setup so that the page title automatically appears as an H1 at the top of the page. Remember, there should be only ONE H1 per page, so if you're adding subheadings to your product listings, use H2 tags only.
✅ About heading font sizes:Most website themes will attach unique styling to the various heading tags. However the styling of a heading tag (the font, color, or font size) is not a ranking factor in search engines. Do not use heading tags as a stand-in for design elements or to add extra space between paragraphs.

How to use Heading Tags (H1, H2, H3)
✅ Heading tags aka H-tags are used to separate and organize the various sections of a webpage.
✅ H-tags rank in order of importance, from H1 to H6, with H1 being the most "important" tag, usually to indicate the title, topic, or main purpose of the page.
✅ H-tags have a cascading hierarchy, similar to CSS markup, or the cascading bullet points in a text document.
✅ Header tags are a very important part of SEO because they improve readability, accessibility, and give a better user experience.
✅ The example provided illustrates the hierarchal ordering of H-tags.
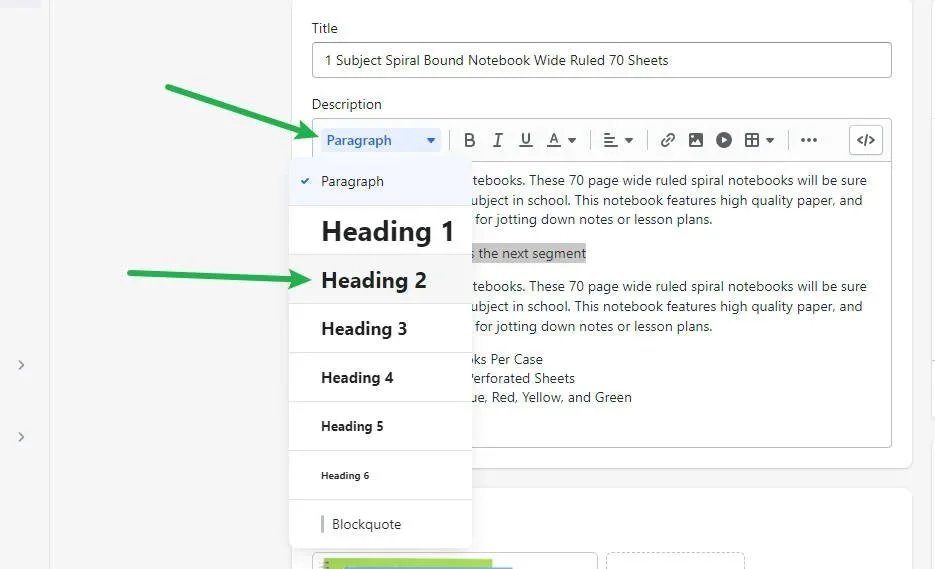
How to create an H2 tag in Shopify:
highlight a line of text in the description field
click the PARAGRAPH drop down
select HEADING 2 from the list of options.
H1 tag: Used to denote the title or main subject of your page. In most Shopify themes, the titles that you assign in the title field (product titles, collection titles, and blog post titles) will automatically appear at the top of your page as an H1, so most of the time you should not have to manually add H1 tags to your content, as there should be only one H1 per page.
H2 tag: The H2 is the tag you’ll use most often in your content. Use H2 tags to label the different sub-sections of a page to make it easier for users to skim the high-level topics covered in your content and find the part that’s relevant to their need. Say your content was a book, then an H1 tag would be the title on the cover, and H2 tags would be used to label the chapters.
H3 tag: These are used to label sub-topics of the H2 tag directly above it in the content. An H2 tag can have multiple H3 tags below it, but if you add an H2 below an H3, it “resets” the hierarchy, and any subsequent H3 tags will be a sub-heading of that second H2 tag. Confused yet?
H4 tag: Similar to the H3, an H4 tag is used to label sub-topics of the H3 directly above it in the content.
H2 tag: As mentioned above, if you add another H2 below an H3 in your content, it “resets” the heading hierarchy. So this H2 is actually another sub-topic of the main H1 up at the top.
Thank you for visiting the Shopify SEO Handbook
Before you go, keep in mind that SEO is a long game. There are no shortcuts or cheat codes that will push your site to the top of the search results, and any service or agency that tells you otherwise is probably not very reputable. The only reliable way to increase your rankings is through the application of hard work, amazing content, time, diligence, best practices, backlinks, social signals, interlinking strategies, and… you get the idea.
If I had to put it in a nutshell, the secret to SEO success is making small, incremental changes until you find the combination of keywords, links, H2s, titles, and URLs that works for you. But really, the best way to outrank the competition is to create the kind of content that YOU would love to see out there on the World Wide Web. At the end of the day, Google is going to rank the pages that offer the most enjoyable experience. So don’t create content to increase your search rankings, create content to explain to the world who you are, what you do, why you do it, and how they can get in on it. You do that, and you won’t have to go searching for an audience, because your audience will be finding you in search.
If you like what you saw here, feel free to share this guide on social media, or link to it in your own content (everybody loves backlinks, including me). For more information about SEO for Shopify Plus, digital marketing services for Shopify storefronts, or Shopify Plus development and design, contact BlueSwitch today. Thanks for reading!
— Bryan Swift, SEO director at BlueSwitch